I'll never forget my first Red Sea liveaboard in 2015. Seven days, twenty-one dives, and by day three my regulator was breathing like I'd packed sand in the second stage. I learned a hard lesson that trip: maintaining dive gear on liveaboard trips isn't optional, it's survival. The combination of salt spray, limited fresh water, cramped storage, and multiple daily dives creates a perfect storm for equipment degradation. After a decade of testing gear across dozens of liveaboard trips—from the Galapagos to Raja Ampat—I've developed a systematic approach that keeps my equipment functioning reliably through week-long dive marathons. This guide will walk you through the daily maintenance routines, storage strategies, and preventive measures that separate gear that performs consistently from equipment that fails when you're two hundred miles from the nearest dive shop.
You'll learn how to maintain dive gear on liveaboard trips through fresh water management, salt contamination prevention, and daily inspection protocols that catch problems before they become dive-ending failures. Whether you're planning your first extended trip or you're a seasoned diver looking to refine your process, these techniques are field-tested across thousands of liveaboard dives. Expect to spend about 15-20 minutes per day on maintenance once you've got the routine down—a small investment that protects thousands of dollars worth of equipment and prevents missed dives.

What You'll Need
Before you step aboard, make sure you've got these maintenance essentials in your gear bag:
- Fresh water rinse containers (collapsible buckets work well for space constraints)
- Microfiber towels (at least 2-3 dedicated to gear drying)
- Silicone grease (small tube of marine-grade silicone for o-rings)
- Spare o-rings kit (sized for your specific regulator first stage, tank valve, and computer battery compartment)
- Mesh gear bag for wet equipment storage between dives
- Soft-bristle brush (old toothbrush works perfectly for cleaning intricate parts)
- Regulator mouthpiece tie wraps (zip ties as backups)
- Multi-tool or small screwdriver set (for minor adjustments—check liveaboard restrictions first)
- Gear-specific manuals or saved PDFs on your phone (for reference on service port locations and pressure relief procedures)
- Logbook or maintenance notes (digital or paper for tracking issues)
- Protective storage bags for computers and cameras when not in use
Most liveaboards provide some fresh water rinse stations, but availability varies wildly depending on the boat's desalination capacity. I always bring a collapsible 5-liter bucket as insurance.
Step 1: Establish Your Post-Dive Rinse Routine Immediately
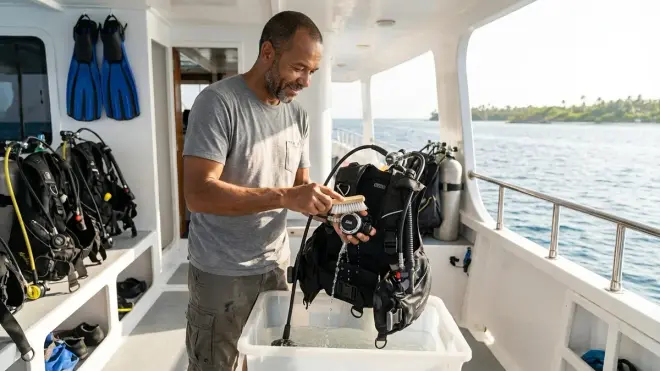
The single most important habit you'll develop for liveaboard gear care is rinsing equipment within 30 minutes of your last dive each day. Salt crystals begin forming almost immediately as water evaporates, and once they're embedded in moving parts, they cause accelerated wear and potential failure modes you won't catch until it's too late.
Here's what actually happens at depth: your regulator second stage processes hundreds of liters of seawater-saturated air each dive. That moisture deposits microscopic salt residue throughout the demand valve, around the diaphragm, and inside the purge button mechanism. Your BCD inflator button gets repeatedly submerged and actuated, pushing salt water into the inflation mechanism spring and seal surfaces. Even your dive computer's pushbuttons accumulate salt in the button stems. I've seen computers fail to register button presses by day five of a trip because salt crystal buildup prevented the button from making electrical contact.
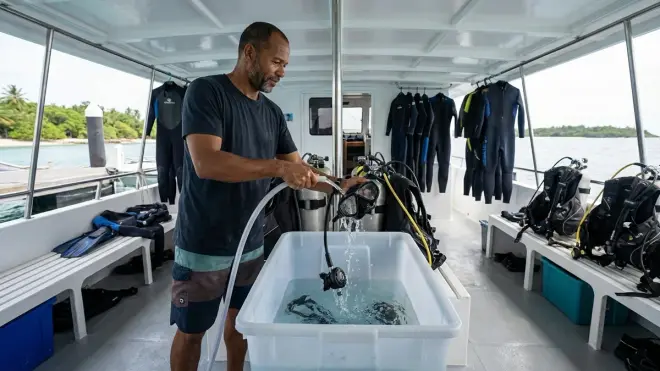
Your post-dive rinse protocol should follow this sequence: regulator first (both stages thoroughly soaked with dust cap secured over first stage inlet—never press the purge button during rinsing as this forces water into the first stage chamber), BCD (inflator mechanism repeatedly actuated underwater in the rinse tank to flush salt from the valve seat), dive computer (buttons pressed multiple times while submerged to work fresh water into the stems), and mask/fins (quick rinse is sufficient unless you've been in particularly silty conditions).
Pay special attention to your regulator's second stage exhaust tee and around the purge button—these areas trap salt water in recessed spaces. I use a soft-bristle brush to gently agitate water around these components. The venturi adjustment lever (if your reg has one) should be moved through its full range while submerged to prevent salt buildup in the pivot point.
For your BCD, don't just rinse the exterior. Partially inflate the bladder, then hold the inflator button down while rotating the BCD to allow fresh water to enter through the inflator mechanism and slosh around inside the bladder. This prevents interior salt buildup that can cause bladder deterioration and valve failures. Check out our detailed BCD maintenance checklist for more on internal bladder care.
Step 2: Manage Limited Drying Space Strategically
Liveaboard deck space is premium real estate, and you'll quickly discover that drying gear competes with twenty other divers trying to do the same thing. The humid marine environment means nothing truly dries between dives—it just reaches various states of dampness. Learning to manage partial drying in confined spaces is essential for maintaining dive gear on liveaboard trips.
Most boats provide rinse tanks and some form of hanging area, but it's rarely sufficient for everyone's gear. Here's my system: immediately after rinsing, I hang my regulator by the first stage dust cap loop (never by the hoses, which creates stress points at the port connections) in whatever shaded area has airflow. Direct sun exposure on a boat deck can exceed 140°F on black rubber hoses, which accelerates rubber degradation and can cause internal component expansion in sealed first stages.
Your BCD should be hung on a proper hanger—not draped over a railing where it folds and traps water in the bladder folds. Hang it with the inflator mechanism at the highest point so residual water drains down and out through the dump valves. Every 24 hours, I partially inflate the BCD to check for air leaks (a slow deflation indicates a developing hole or valve seal problem) and to help the interior surfaces dry. If you're doing four dives a day in humid tropical conditions, that bladder interior stays damp the entire trip unless you're proactive about ventilation.
I dedicate one microfiber towel exclusively to surface water removal—after rinsing, I thoroughly wipe down my regulator stages, computer, and BCD inflator mechanism. This removes 80% of the water immediately and reduces the drying time significantly. The second microfiber towel stays dry and is reserved for pre-dive equipment that I don't want to get wet before entering the water (like wiping down my computer display before a night dive).
For equipment storage between dives, avoid sealed plastic containers that trap moisture. I use a large mesh dive bag that allows continuous airflow even when gear is stored in my cabin. Computers, cameras, and anything with electronic components get stored in a dry area—I keep mine in a sealed dry bag with those small silica gel packets (the kind that come in electronics packaging). Replace or regenerate these desiccant packets every 2-3 days as they saturate quickly in marine environments.
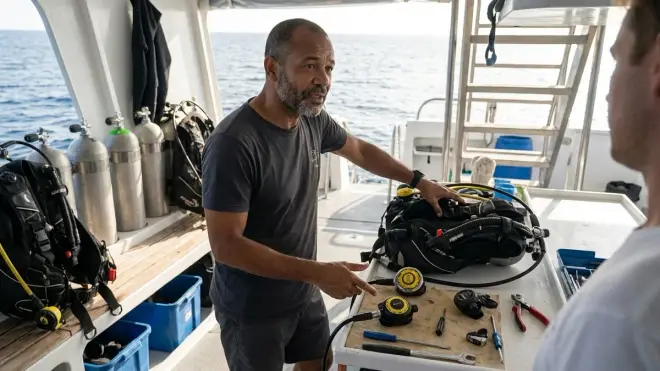
Step 3: Conduct Daily Pre-Dive Inspections with Specific Focus Areas
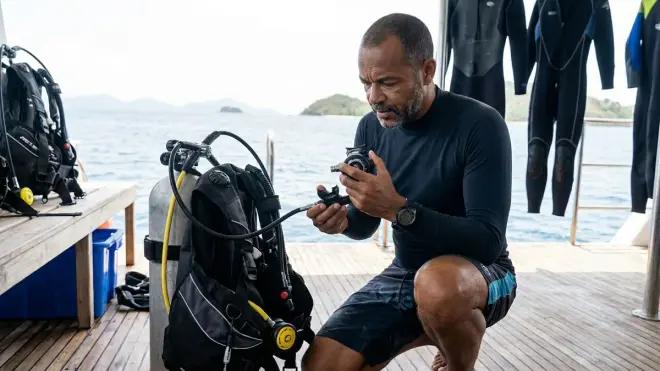
Before each day's first dive, spend five minutes conducting a systematic inspection that targets the specific failure modes most likely to develop during multi-day use. This isn't your typical buddy check—this is preventive maintenance that catches developing issues before they cascade into bigger problems.
Regulator inspection: Pressurize your first stage and listen carefully for any hissing that wasn't present on day one. A developing leak at the first stage to second stage hose connection often starts as a barely audible whistle. Check the intermediate pressure (if you have a gauge) or simply test breathing resistance—if your reg suddenly feels harder to breathe, you may have a developing IP creep issue that needs attention. I learned this the hard way on a Maldives trip when my first stage IP slowly climbed from 140 to 165 PSI over four days, eventually causing a slight freeflow at the end of dives when my tank pressure dropped below 500 PSI.
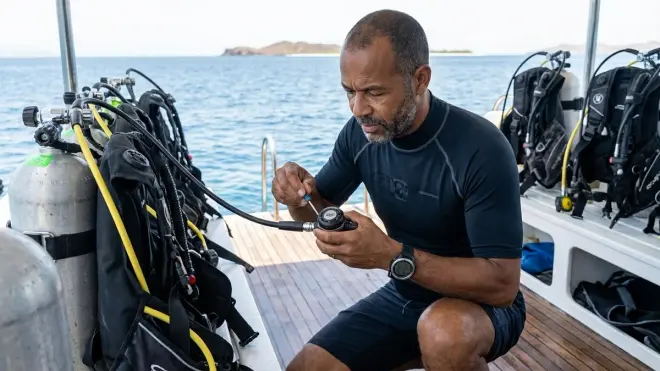
Examine all hose connections where they attach to the first stage. Salt crystal accumulation here can work its way into the o-ring seal and cause slow leaks. If you notice any salt buildup, you'll need to carefully rinse and potentially apply a microscopic amount of silicone grease—but only if you're familiar with the process. Over-greasing can actually attract more contaminants.
BCD inspection: Press each dump valve button and listen for a clean, crisp actuation. A sticky or sluggish dump valve means salt is building up in the spring mechanism. Your inflator button should move smoothly without sticking—I've had inflator buttons that worked fine for three days then suddenly stuck in the inflate position on dive four, creating an uncontrolled ascent scenario that could have been prevented with daily inspection. For more on BCD pre-dive checks, see our BCD pre-dive safety checklist.
Dive computer: Check that all display segments illuminate properly, buttons respond crisply, and battery indicators show sufficient charge. Salt buildup on the contacts can cause intermittent display failures. If your computer has biometric sensors, verify they're reading correctly before the dive—I clean mine with fresh water and a microfiber cloth every morning.
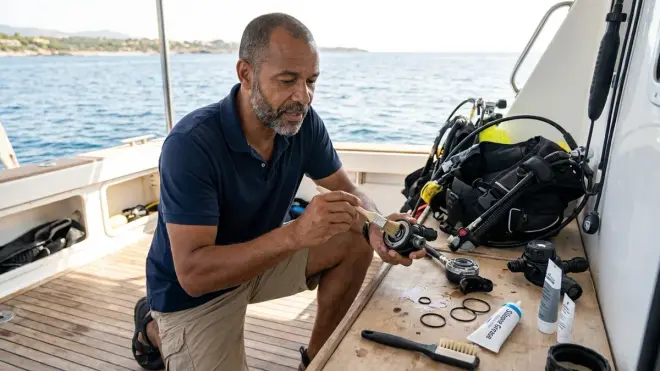
O-ring inspection: This takes thirty seconds and prevents most catastrophic failures. Check your tank valve o-ring before mounting your regulator—any nicks, flattening, or degradation means replacement. I carry a small o-ring kit and replace tank valve o-rings every 3-4 days on extended liveaboards regardless of their appearance. They're cheap insurance. Also check your computer battery compartment o-ring if you're changing batteries mid-trip.
Step 4: Protect Equipment from Salt Spray and Deck Contamination

One thing new liveaboard divers don't anticipate is how salt spray permeates everything on deck. That fine mist you can barely see is coating your equipment with a salt layer between dives, even when it's "drying." Environmental contamination management is a crucial component of maintaining dive gear on liveaboard trips.
I keep my regulators and computers in a covered area whenever they're not actively being rinsed or used. Many divers leave their full gear setup on deck for convenience between dives, but this exposes everything to continuous salt spray, UV degradation, and deck traffic. I've seen regulators kicked across the deck, computers knocked into rinse tanks, and BCD inflator hoses stepped on—all preventable with proper storage discipline.
For cameras and housings, the stakes are even higher. Salt spray on an improperly sealed housing leads to the nightmare scenario: a slow leak that doesn't flood immediately but allows salt water to enter and corrode electronics over multiple dives. After each dive, I rinse my camera housing thoroughly, then dry it completely before opening. I use compressed air (if available on the boat) or careful wiping to remove water from the o-ring sealing surface before breaking the seal. Any salt crystal on that sealing surface becomes a potential leak path on the next dive.
Your wetsuit deserves attention too. Salt buildup in neoprene causes material degradation and that characteristic stiffness. I rinse mine thoroughly after the last dive of each day and hang it inside-out in a shaded area. The inside surface holds more body oils and residue, so alternating which side faces out helps both surfaces dry. For detailed wetsuit care protocols, check our wetsuit maintenance checklist.
Deck surfaces on boats are contaminated with fuel residue, hydraulic fluids, and general grime that you don't want on your gear. I never place my regulator or computer directly on deck—I use a dedicated microfiber towel as a clean surface. It sounds obsessive until you've had a regulator second stage that tastes like diesel because someone set it down in a fuel residue spot.
Step 5: Monitor and Address Developing Issues Before They Become Failures
The beauty of multi-day liveaboards is the rhythm of regular diving. The curse is that small problems compound quickly when you're doing 3-4 dives daily. I keep a mental (and often written) log of any changes in equipment performance, no matter how subtle.
Breathing resistance changes: If your regulator breathes noticeably different on day four than it did on day one, something's changing. Increased resistance often indicates salt buildup in the second stage demand valve or a developing issue with first stage IP. Easier breathing or slight freeflow tendencies can indicate IP creep (rising intermediate pressure) that will worsen. I once ignored a slight freeflow that developed on day three of a Socorro trip—by day six, the regulator was freeflowing at any depth below 60 feet, cutting my bottom time significantly.
Document these observations. I use my dive log to note equipment behavior: "slight whistle from first stage at 700 PSI" or "BCD dump valve feels sticky." This creates a timeline that helps you decide whether to switch to backup equipment or address the issue immediately. For more on regulator service and troubleshooting, see our guide on how to service a scuba regulator.
Computer display anomalies: If your computer screen shows any unusual behavior—segments missing, contrast fading, buttons requiring harder presses—take action immediately. I've learned to never assume "it'll probably be fine." On a Palau liveaboard, my computer's backlight started flickering intermittently on day two. I switched to my backup computer for the remaining dives. Post-trip inspection revealed water intrusion around a button stem—exactly the kind of failure that could have left me without decompression information mid-dive if I'd ignored the warning signs.
Physical wear indicators: Check your mask strap for developing cracks (especially where it attaches to the mask frame), fin strap buckles for stress cracks, and BCD shoulder strap webbing for fraying. These failures are predictable and preventable. I carry a spare mask strap and fin straps in my save-a-dive kit specifically for mid-trip replacements.
The liveaboard crew can be excellent resources here. Experienced dive masters have seen every possible equipment failure and can often diagnose developing issues faster than you can. If something feels different, ask them to take a look. I've had boat crew spot a cracked first stage port plug that I'd missed during inspection—that's a flooding risk that could have ended my trip.
Step 6: Implement a Fresh Water Conservation Strategy

Here's the reality: liveaboards have limited fresh water, and you're competing with twenty divers and the boat's operational needs. Some boats restrict fresh water use to specific rinse times, others charge for excessive use beyond basic equipment rinsing. Understanding the boat's water production capacity and implementing a conservation strategy is essential for maintaining dive gear on liveaboard trips without creating conflicts.
Before your trip, research the boat's desalination system capacity. Modern liveaboards typically produce 500-1000 gallons daily, but older boats or those in remote areas may have more limited capacity. I always ask the dive briefing on day one about water availability and any restrictions.
My conservation approach: prioritize critical rinses. Regulators, computers, and BCD inflators get thorough fresh water rinses after every dive. Masks, fins, and wetsuits get a quick rinse if water is abundant, or can wait until the end of the day if water is restricted. I reuse rinse water when possible—the water I used to soak my regulator is still clean enough for a mask rinse afterward.
Some divers bring their own portable rinse systems—a spray bottle filled with fresh water can provide targeted rinsing for critical components without using tank quantities. I've used this approach on boats with severe water restrictions in remote areas like the Similan Islands. A 1-liter spray bottle provides enough targeted rinsing for a regulator, computer, and BCD inflator mechanism.
Never rinse equipment with residual soap or shampoo water. I've seen divers "conserve" fresh water by rinsing gear in their deck shower runoff—that soap residue causes rubber degradation and can contaminate o-rings. If fresh water is that limited, focus on the most critical components and accept that some gear will maintain salt exposure until you're back on shore.
For longer trips (10+ days), some components need more thorough attention. I dedicate time every 3-4 days for a deeper rinse session where I soak my regulator stages for 10-15 minutes in fresh water, allowing time for salt to dissolve from internal crevices. This is particularly important for cold water regulators with more complex environmental sealing systems where salt can work its way into sealed chambers.
Step 7: Prepare Equipment for Extended Storage Between Dive Days
Some liveaboard itineraries include transit days where you won't be diving—these 24-hour periods are gold for comprehensive equipment maintenance. This is when you can conduct deeper maintenance that goes beyond daily rinse routines.
On a transit day, I completely flush my BCD bladder with fresh water. Here's the process: fill the bladder about 1/3 full through the inflator mechanism using a low-pressure inflator (or carefully pouring water through the mechanism), seal it by inflating slightly with air, then shake and rotate the BCD to slosh water throughout the entire internal surface. Drain through the dump valves, and repeat 2-3 times. This removes accumulated salt and biological residue from the bladder interior. You'll be shocked at what comes out—cloudy, salty water full of microscopic debris that's been accumulating since day one.
Transit days are also perfect for air-drying equipment that's been continuously damp. I hang everything in the sun (if temperatures are moderate—remember that extreme heat degrades rubber) for several hours to thoroughly dry. This breaks the cycle of constant moisture exposure that promotes material degradation.
Check all your backup equipment on transit days. That spare mask, backup computer, or redundant regulator has been sitting in your gear bag—make sure it's still functional and hasn't developed issues from storage in the humid marine environment. I pressurize my backup regulator and test breathing resistance, verify my backup computer powers on and displays correctly, and check that my backup mask strap hasn't degraded.
Use transit days to reorganize your gear bag and dive crate. That mesh bag of small parts has probably gotten jumbled—take inventory of o-rings, zip ties, and other consumables. I once discovered on a transit day that I'd used three tank valve o-rings and only had two left with four dive days remaining. Being aware of consumable depletion lets you potentially resupply at the next port or adjust your replacement schedule.
If your liveaboard visits a port with a dive shop, transit days are when you can acquire replacement parts or address developing issues. I've had crew members help arrange visits to island dive shops where I could get a regulator serviced mid-trip or replace a BCD dump valve that was failing. This kind of proactive problem-solving prevents issues from ending your trip early.
Pro Tips & Common Mistakes
The biggest mistake I see: divers treating liveaboard maintenance like single-day diving. You can get away with minimal gear care when you're diving Saturday and not again until next Saturday—your equipment has a week to dry completely. On a liveaboard, you're diving again in four hours, then four hours after that. The cumulative effect of salt exposure without proper maintenance creates failures by mid-week.
Pro tip for regulators: when hanging to dry, position your second stage mouthpiece-down so any residual water drains out through the mouthpiece rather than pooling around the diaphragm housing. This simple orientation change prevents water from sitting against the diaphragm and causing premature degradation. I learned this from a regulator tech after I couldn't figure out why my second stage diaphragms were failing prematurely—turns out I was storing them wrong for years.
Common mistake with BCDs: inflating the bladder completely for storage between dives. Many divers think this helps dry the interior, but it actually stretches the bladder material and stresses seams when the BCD is jostled or compressed in storage. Partial inflation (about 30-40%) provides interior air circulation without overstressing the material.
Pro tip for dive computers: disable battery-draining features you don't need. GPS tracking, continuous heart rate monitoring, and wireless connectivity drain batteries faster. On a 7-day trip, these features can mean the difference between making it through or having to change batteries mid-trip (which requires dealing with o-ring replacement in a humid marine environment—not ideal). Learn more about managing computer features in our dive computer maintenance checklist.
Critical mistake with camera housings: opening the housing on a wet deck to check your shots between dives. I've watched photographers lose thousands of dollars of equipment because they couldn't wait until they were in a dry environment. That one drop of salt water that falls onto the o-ring groove when you crack the housing open? That's your flood right there. Wait until you're in your cabin with a dry towel and controlled conditions.
Pro tip nobody mentions: bring equipment-specific lubricants. Don't use random silicone grease on everything. Christolube is ideal for oxygen-compatible equipment if you're diving nitrox (which you should be on liveaboards to maximize bottom time), but it's overkill for most applications. Standard marine-grade silicone grease works for tank valve o-rings and most seals. Never use petroleum-based lubricants on anything that contacts high-pressure air. For more on regulator maintenance specifics, check out regulator intermediate pressure fundamentals.
Frequently Asked Questions
Q: How often should I rinse my equipment during a liveaboard trip with 4 dives per day?
A: Rinse your regulator, BCD inflator mechanism, and dive computer thoroughly after your last dive of each day, and do quick rinses between dives if fresh water is readily available and you notice significant salt spray exposure. At minimum, all equipment that came in contact with salt water needs a proper soak and rinse within 30 minutes of your final dive each day to prevent salt crystal formation in moving parts and seals.
Q: Can I use the boat's deck shower water to rinse my dive equipment?
A: Only if it's confirmed fresh water without soap residue—many deck showers on liveaboards are salt water systems, and some mix fresh water with salt water to conserve capacity. Always verify with the crew what comes out of which water source, and never rinse gear with soapy water as detergent residue accelerates rubber degradation and contaminates o-rings.
Q: What should I do if my regulator starts breathing harder mid-trip?
A: Switch to your backup regulator immediately and don't use the affected regulator until you can diagnose the problem. Increased breathing resistance usually indicates salt buildup in the second stage demand valve, a developing intermediate pressure issue in the first stage, or debris in the valve seat—all of which can worsen rapidly and lead to complete failure if you continue using it without addressing the root cause.
Q: Is it better to store my dive computer in a dry bag or let it air out with the rest of my gear?
A: Store your dive computer in a dry environment (sealed bag with desiccant) after it's been thoroughly rinsed and dried—computers need air circulation during the drying process but should be protected from continuous salt spray exposure and humidity once dry. Salt spray corrosion on computer contacts and button mechanisms is cumulative and will eventually cause failures if the computer is left exposed on deck between dives.
Summary
Maintaining dive gear on liveaboard trips comes down to consistent daily routines, strategic water management, and catching small issues before they cascade into trip-ending failures. The combination of multiple daily dives, limited fresh water, constant salt spray exposure, and humid storage creates conditions that accelerate equipment degradation exponentially compared to weekend diving. Your post-dive rinse routine is non-negotiable—focus on regulators, BCD inflators, and computers within 30 minutes of your last dive each day. Manage your drying space strategically, protect equipment from deck contamination, and conduct systematic pre-dive inspections that target the specific failure modes most likely to develop during extended use. Document any changes in equipment performance and address them immediately rather than hoping they'll resolve themselves.
I've logged hundreds of liveaboard dives across every ocean, and the divers who have the best experiences are the ones who treat equipment maintenance as seriously as dive planning. The fifteen minutes you spend each evening caring for your gear pays dividends in reliable performance, extended equipment lifespan, and the confidence that your regulator will breathe smoothly on dive twenty just like it did on dive one. Your gear takes you to some of the most remote and spectacular dive sites on the planet—return the favor by maintaining it properly.